Personal Case Study

I have a commercial background, but I’m on the MA Creative App Development course because I want to be well equipped to create my own startup venture, with a mobile app sitting at the core of the business and I want to feel confident that I can launch and grow that business into a success story. So, I’m using the course to develop the full range of skills and competencies that I need to become a developer of great mobile apps.

Skills & Competencies

I started by looking at the key skills and competencies that a great app developer needs, and through brainstorming, with some internet research, I found myself developing a model to help me to see where I need to be.  This is how I see it:

The skills, group nicely into a trinity of families:

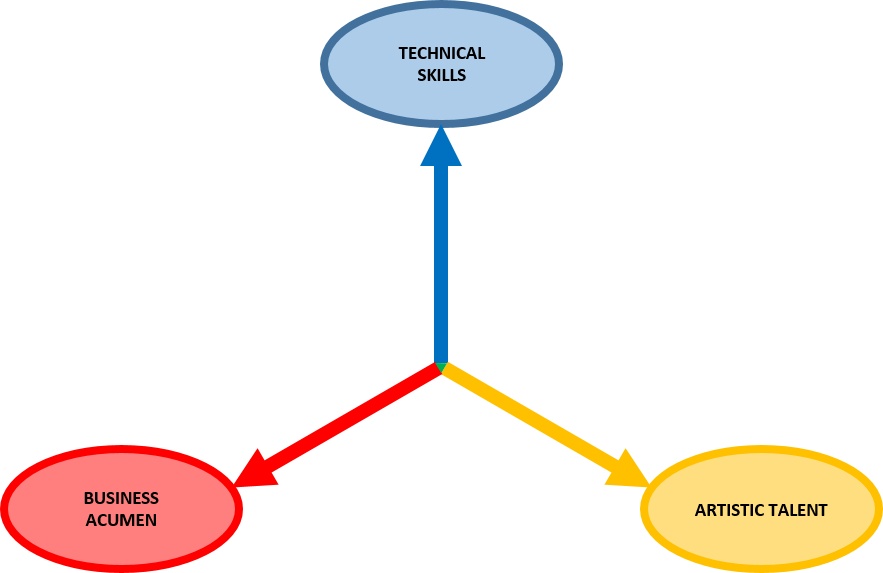
  • Technical skills – so that I can create and build an excellent product
  • Business acumen – so that I can identify market needs and create a business model that successfully delivers a financially viable solution.
  • And artistic talent – so that I can deliver a user experience that supports the brand, creates another competitive selling point, and nurtures adoption and loyalty.

And I rank them in that order of importance for me.

Each of the skills families is an umbrella for an array of hard skills, each with its own level of relevance and priority in terms of how it impacts my own short, medium and long-term objectives.

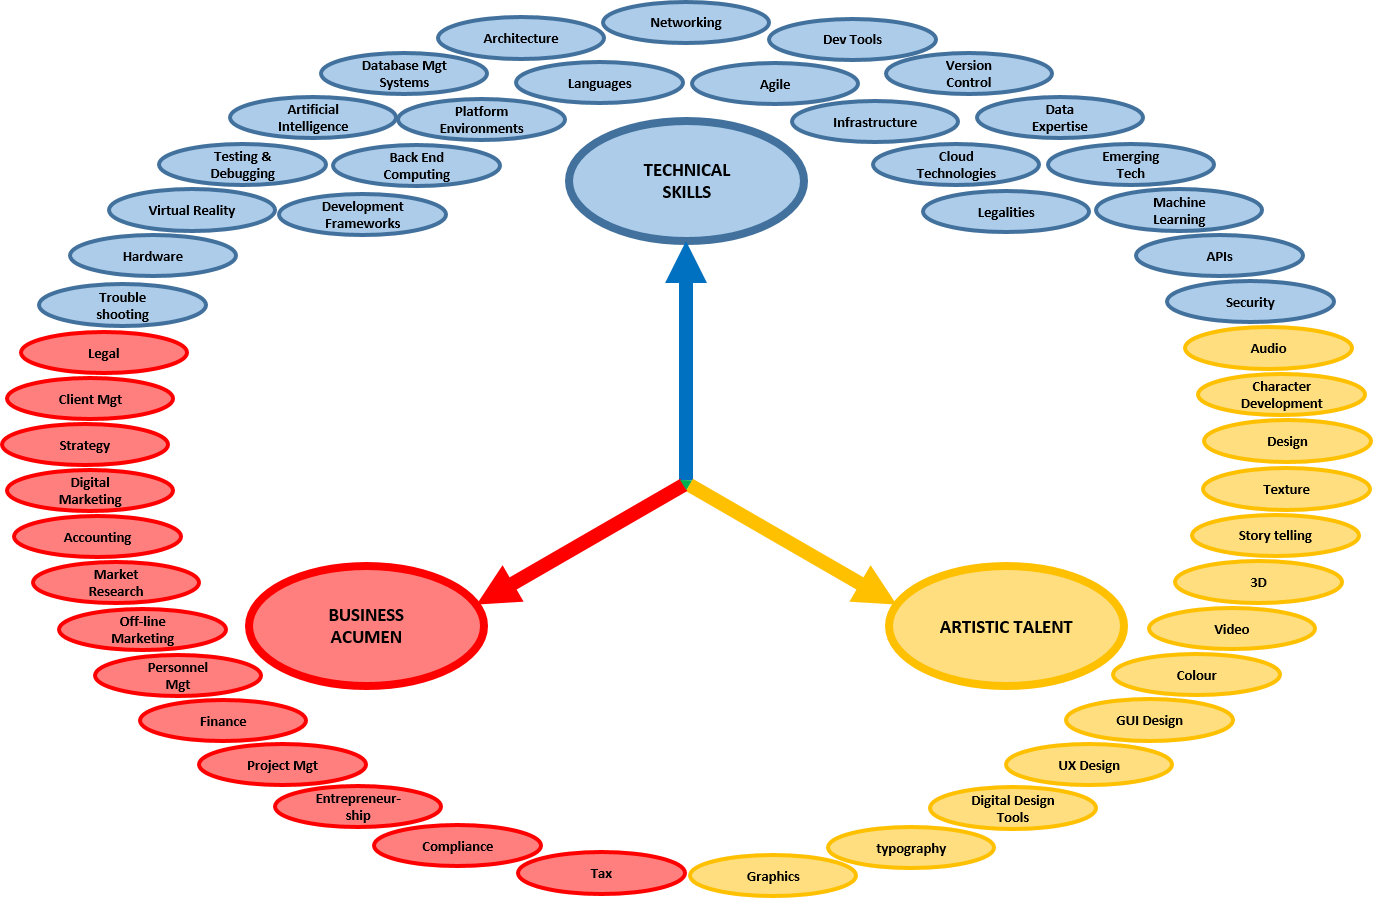
And all of this is supported by a range of soft skills.

I conducted a subjective self-assessment of my starting point, based on my achievement to date and peer comparison, and the green triangle represents my perceived current capability as an app developer.

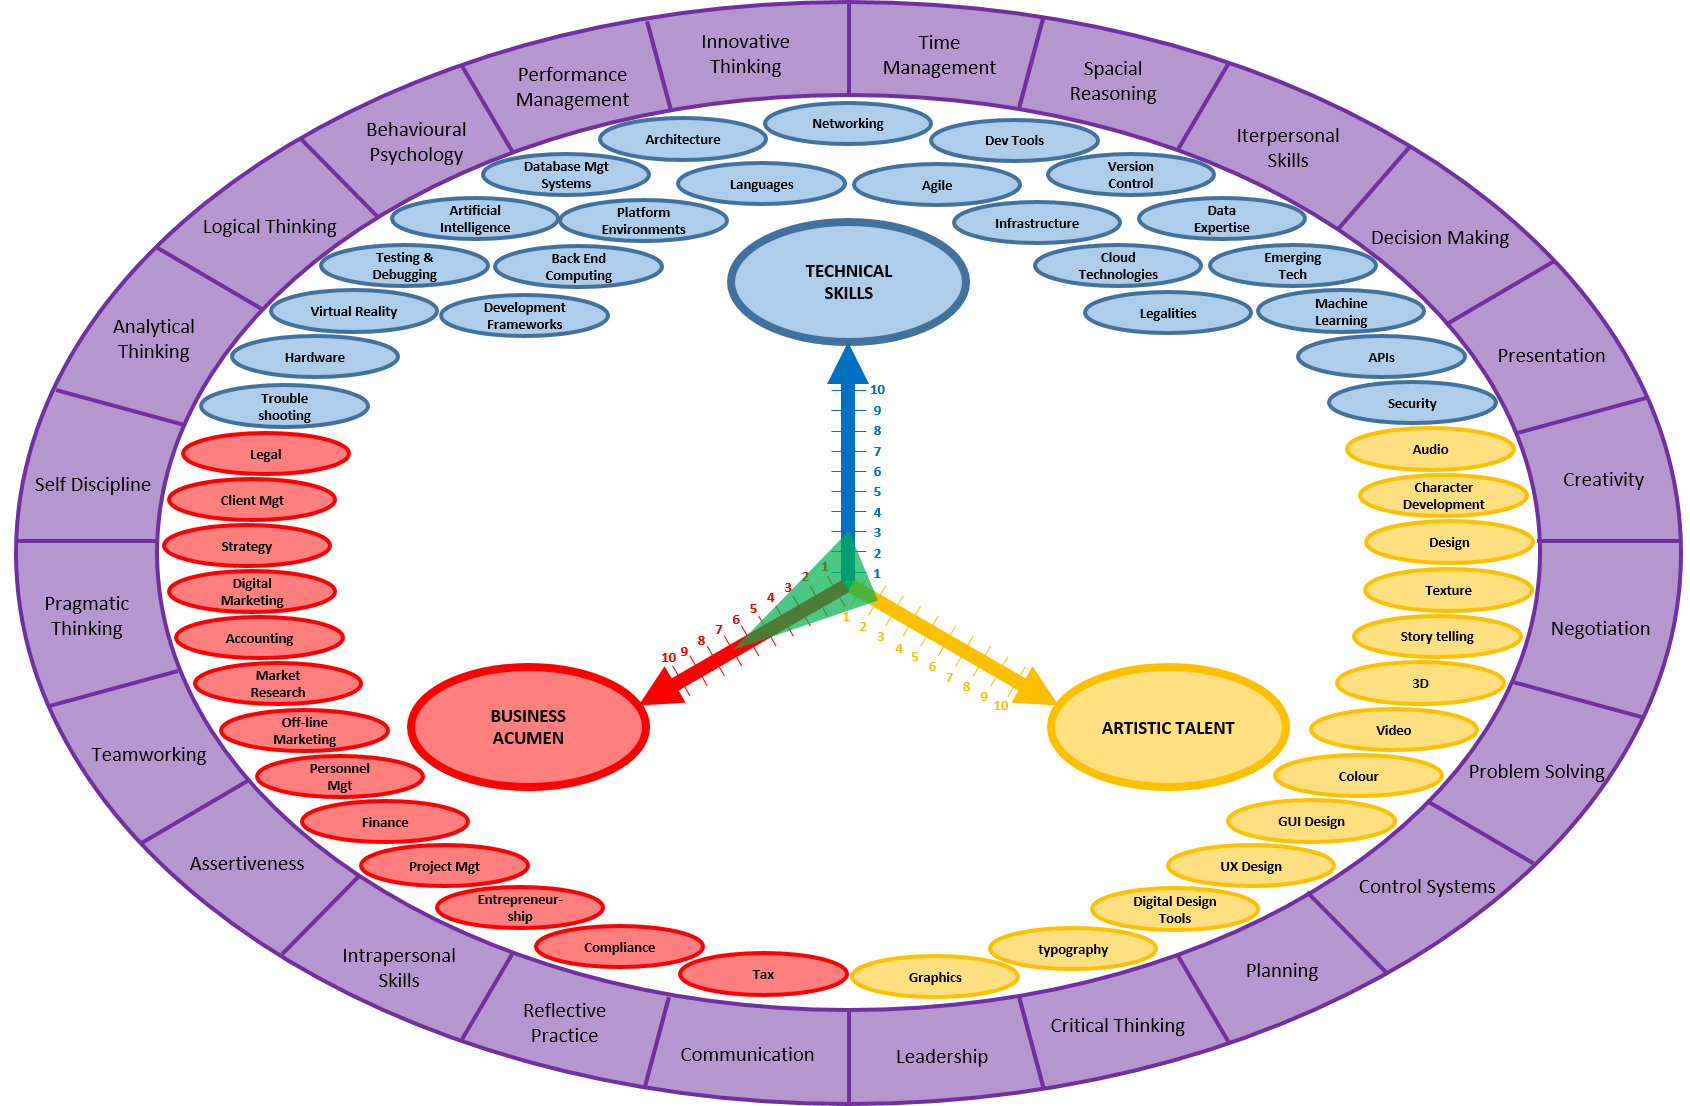
I intend to get my business venture off the ground on my own, initially, and gradually build my team of specialists around me, as and when necessary, and so I need to spend the next 2 years bringing my score for each of the skills families to at least a 9.  The red area represents my currently perceived skills gap.

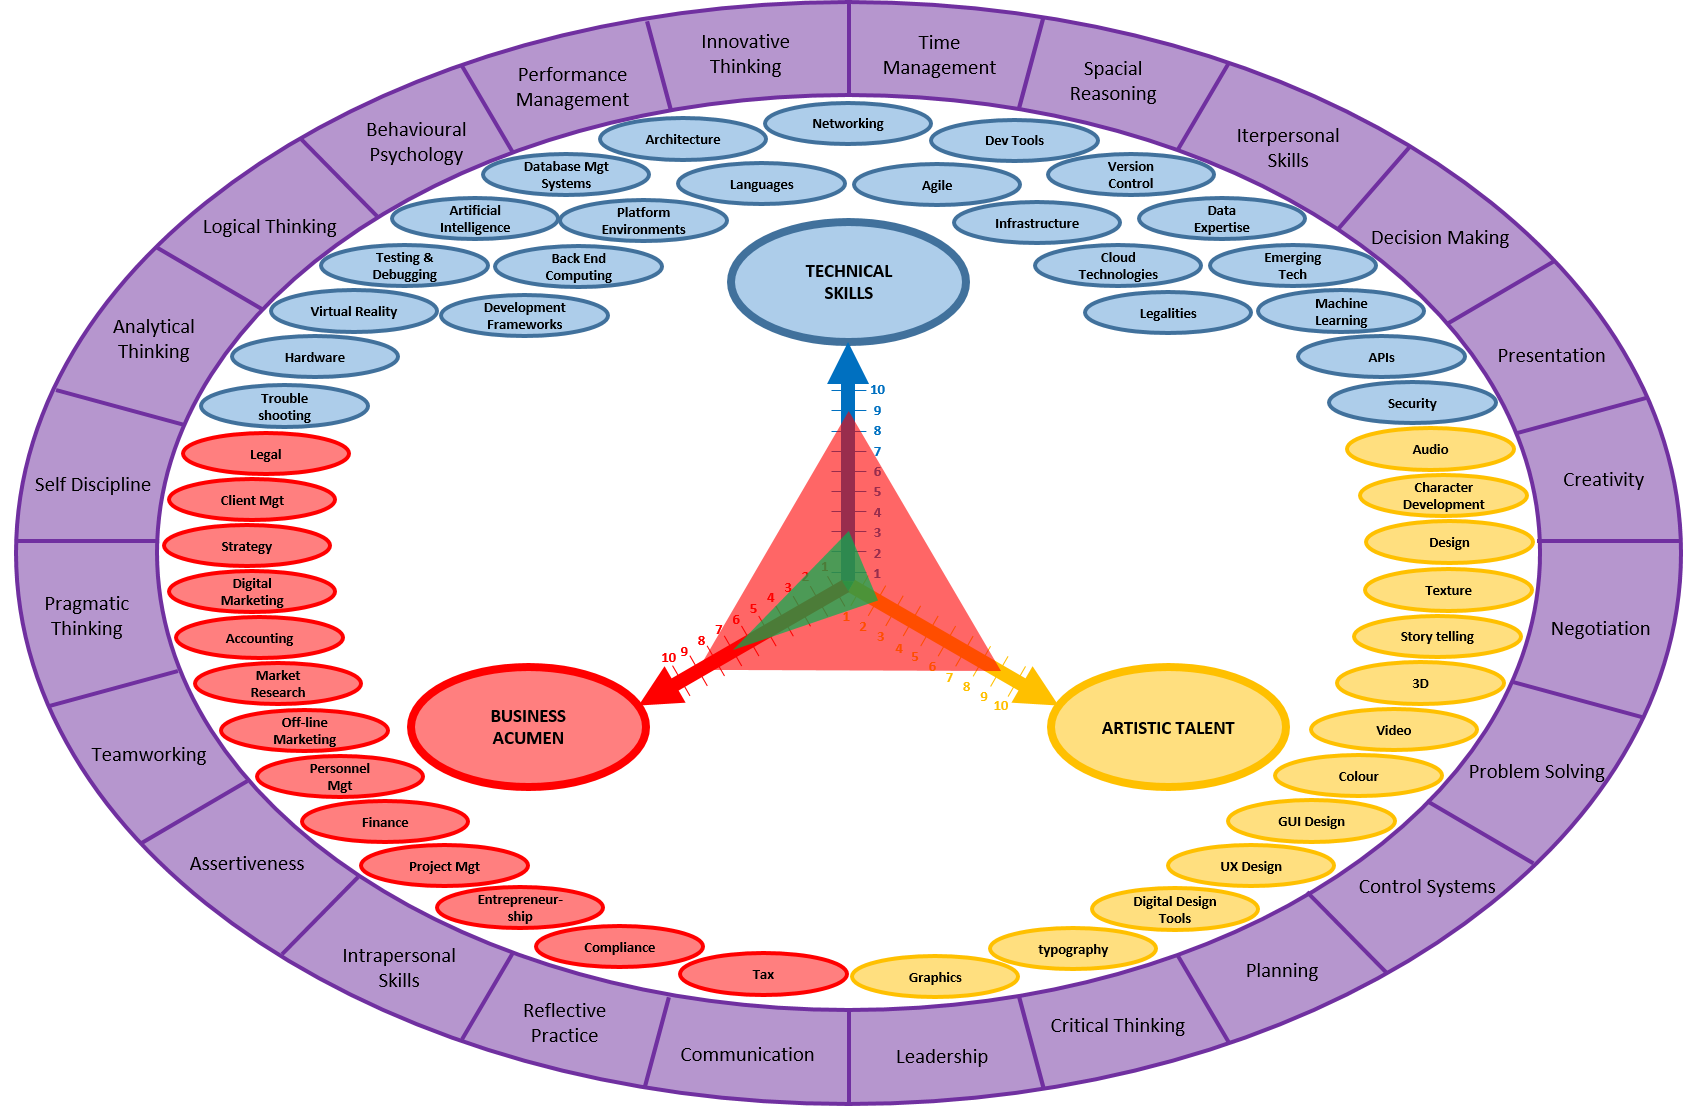
The arrows at the end of each scale, point toward infinity, representing my appreciation for endless learning opportunity, in order to exploit new technologies, rapid adaptation of developing industry trends, and satisfy ever-changing consumer demands.

My priorities for the course lie with the development of my technical skills.  It’s imperative that I bring those up to speed as quickly as possible, so that I have a solid foundation for the rest of the course.

I may not have an IT background, but I do bring some solid transferrable skills.  I’m very analytical and pragmatic, with a good balance of both logical and creative thinking for problem solving.  However, building this model brought a realisation that I hadn’t fully appreciated the enormity of the task ahead, and just how much of it is completely new to me.  I’m viewing this as a stretching, but achievable challenge that I’m fully committed to, but, at times, I’ve felt a little overwhelmed by the size of the skills gap, and there is a degree of imposter syndrome that I’m currently wrestling with. I just need to keep a calm head, eat this elephant one bite at a time, and trust in the support network and resources that the course provides, to help get me there.
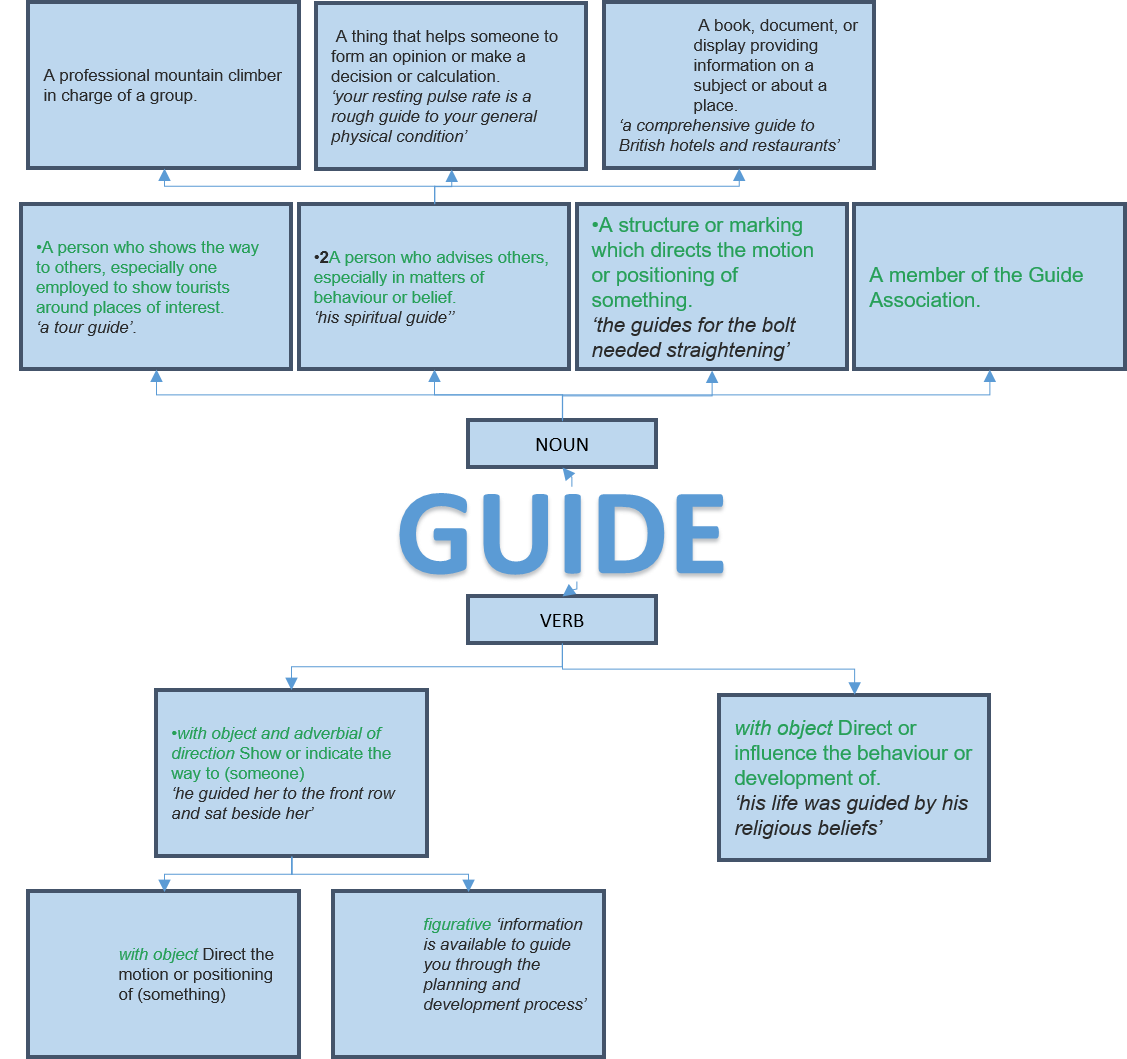
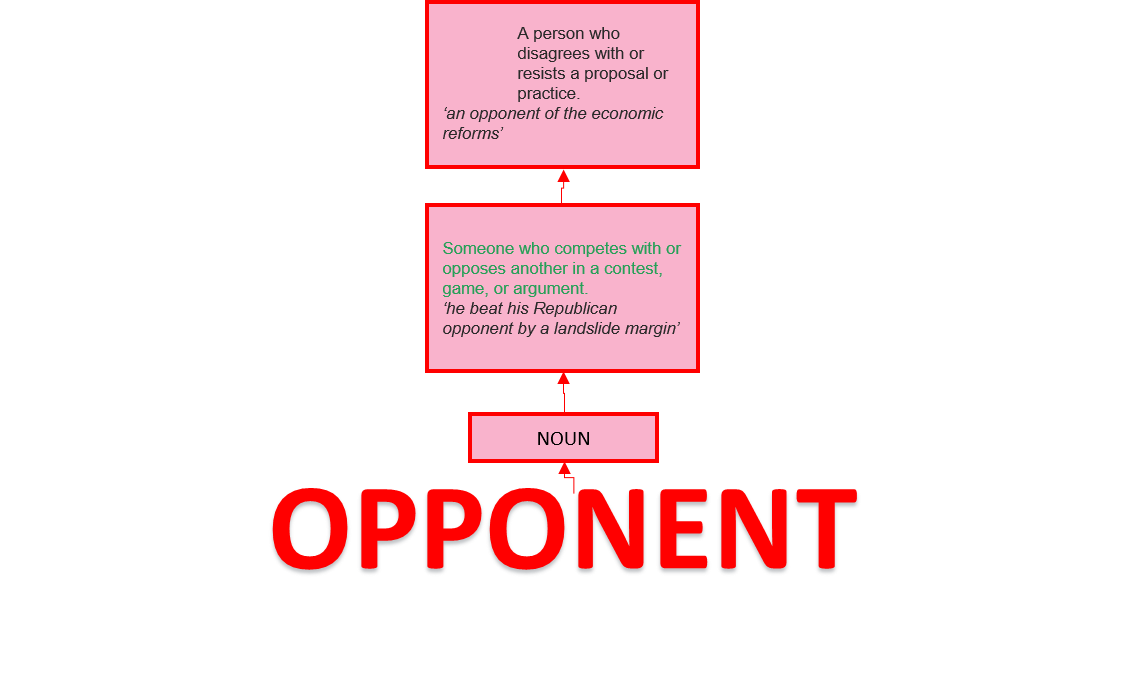
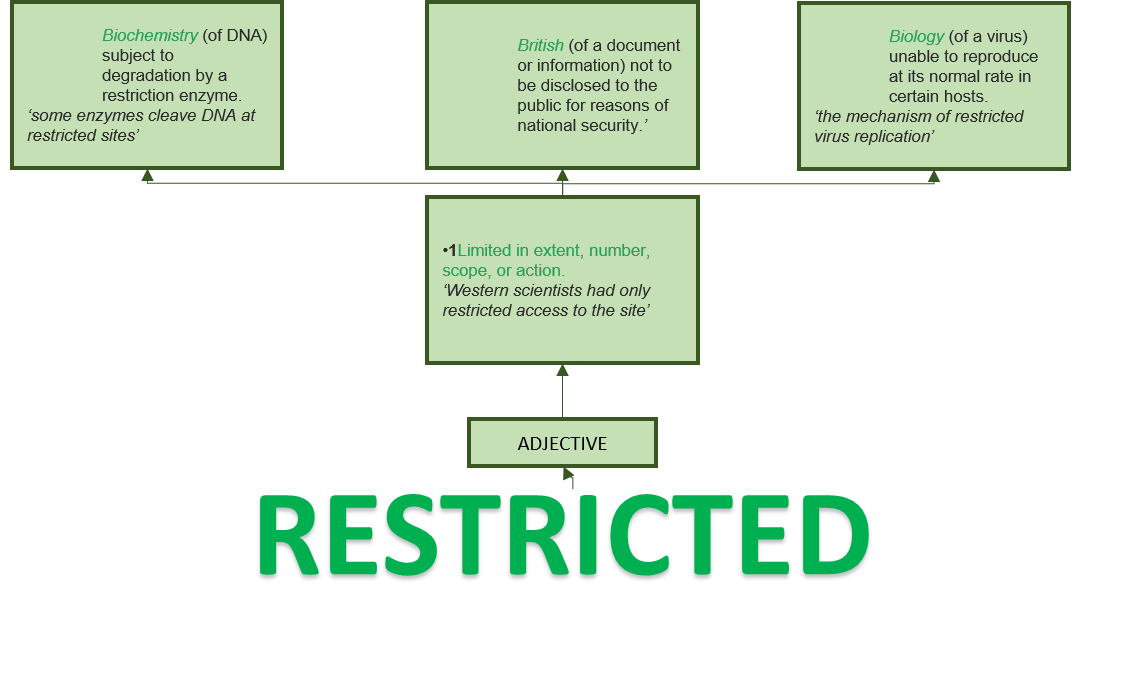
The App Jam

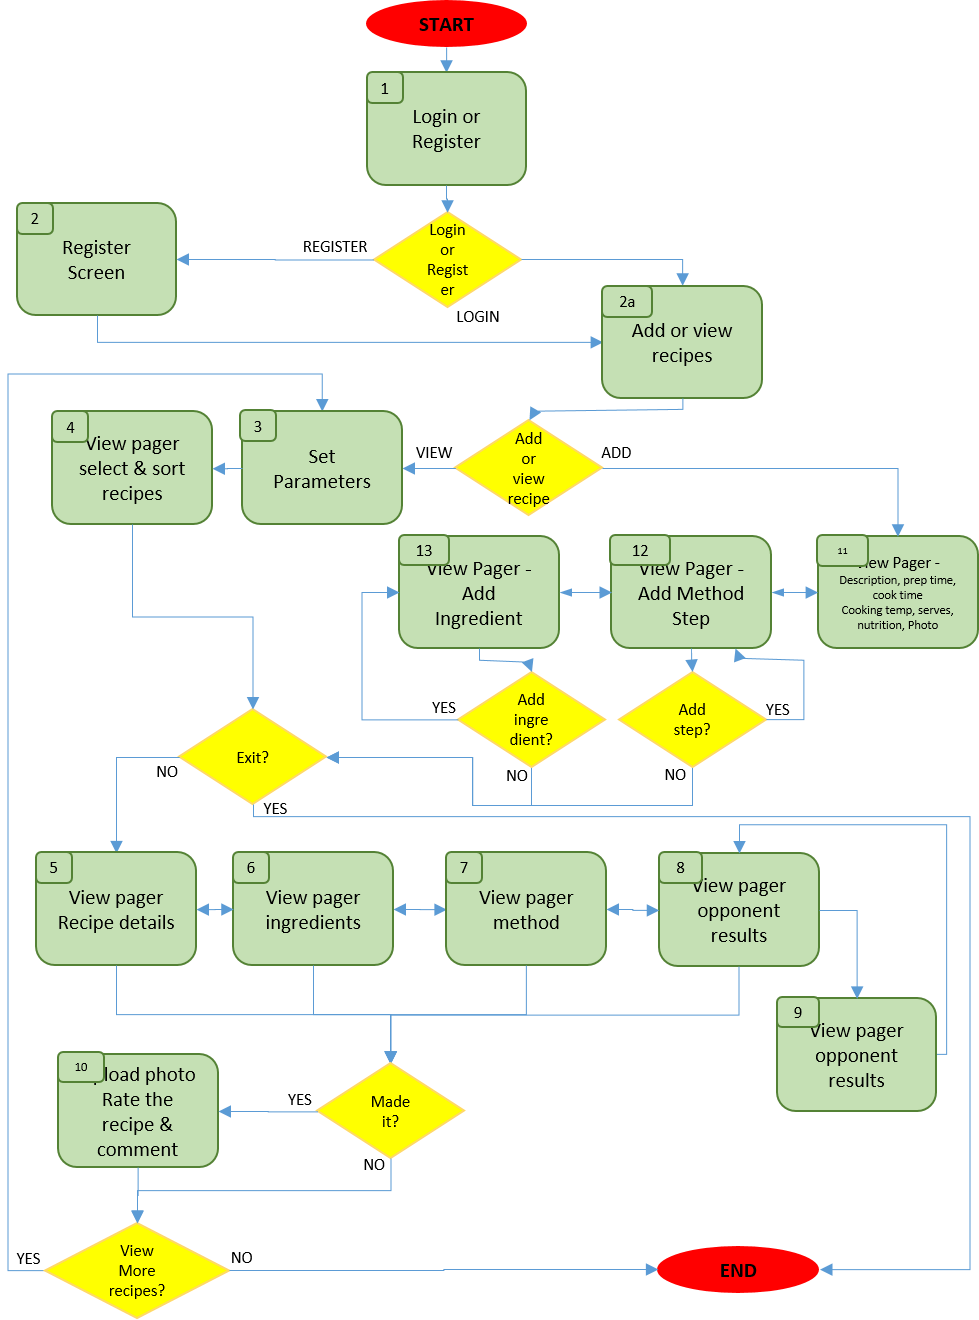
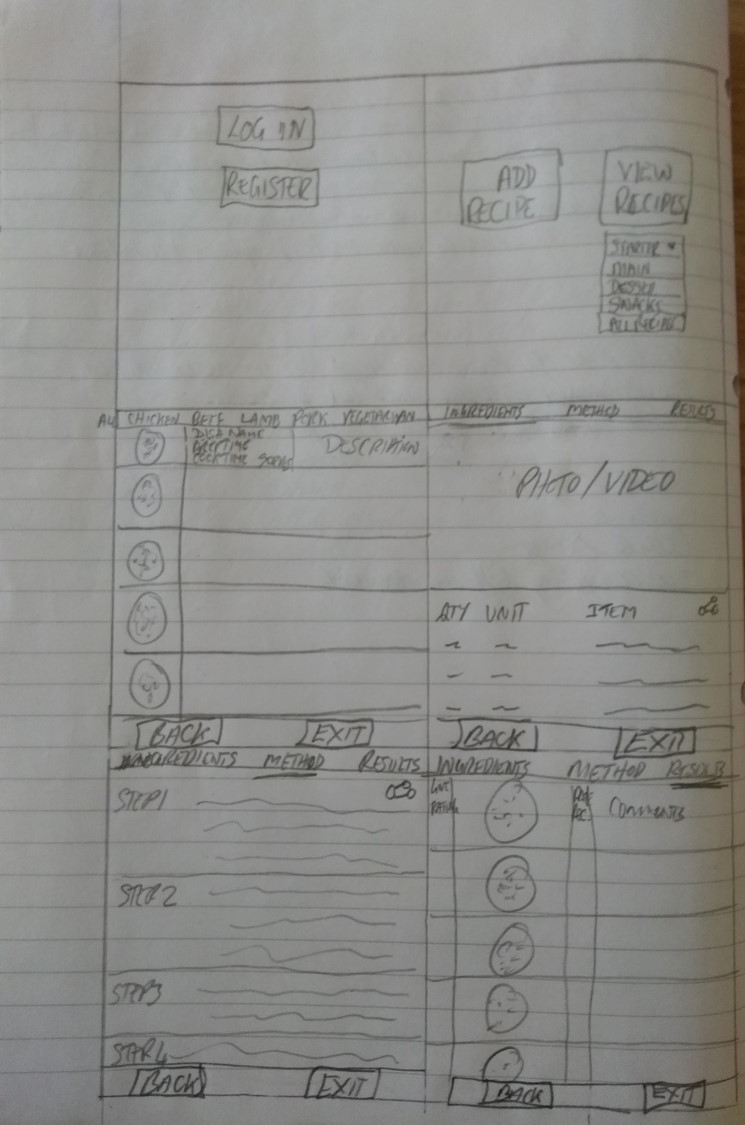
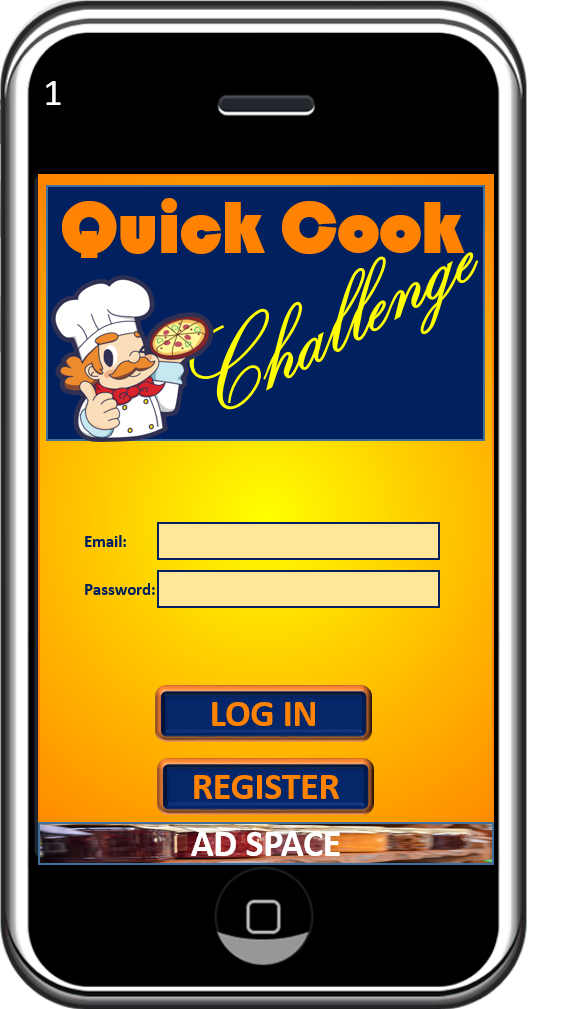
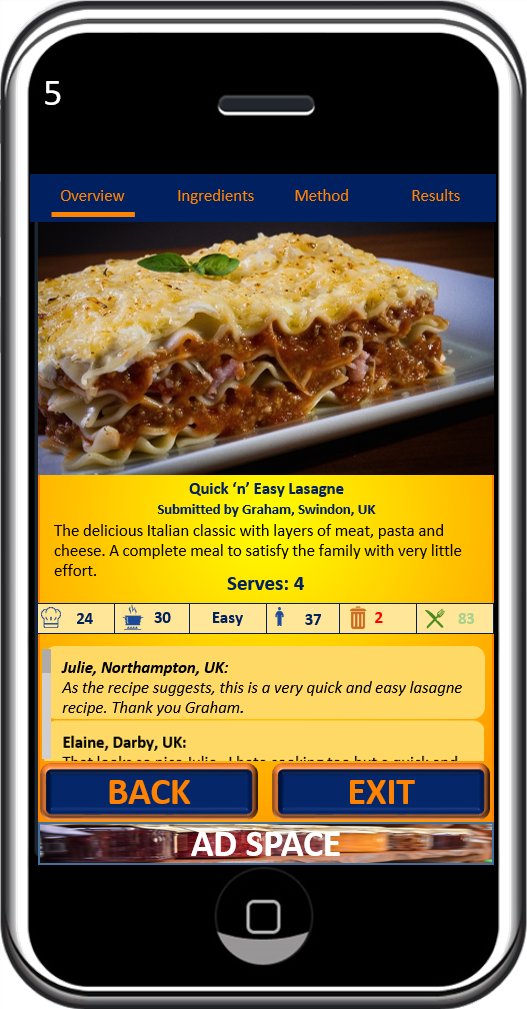
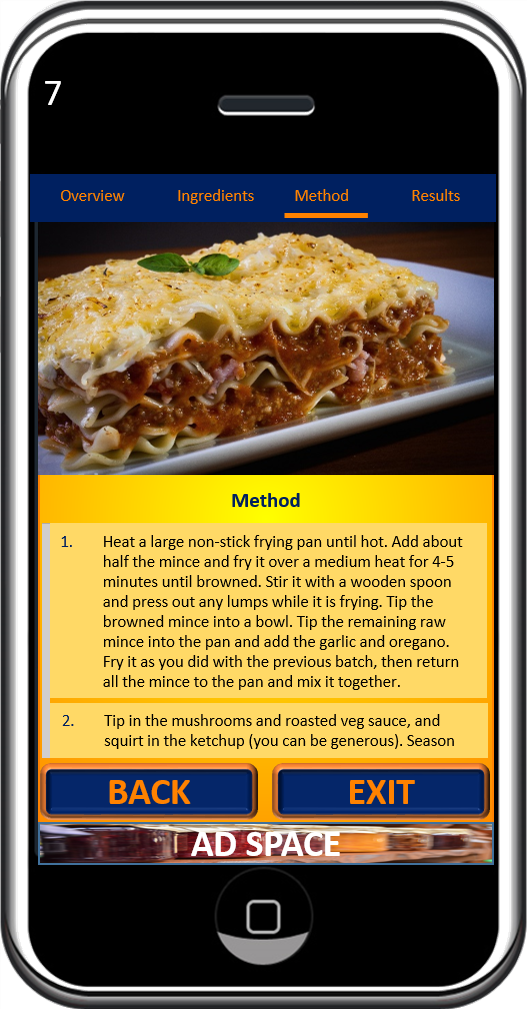
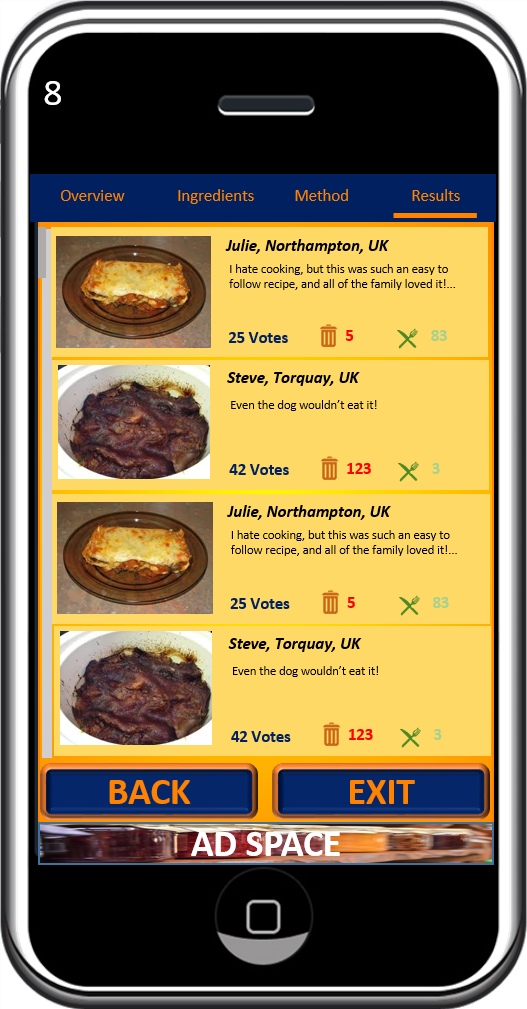
The week 3 app jam was an end-to-end development exercise, with a theme based on the words “guide”, “opponent” and “restricted”, which were generated using VNA cards.  This was an opportunity for me to draw on everything I’d learned, and assess my strengths and weaknesses within that context. I knew from the outset that the jam had come far too early in the process for me, as I lacked the necessary technical skills.  Although, I hadn’t discounted the possibility at that point, I knew that building a fully working app wasn’t a realistic goal for me. So, I primarily focused on what I could learn from the process of the jam, with the aim of creating a paper prototype and then building a fully working app if I could improve my skills sufficiently in time, but this became a secondary concern for me.

As expected, I didn’t get to build the app.  But I did get a good experience of the process, taking away some key lessons:

  • The right tools for the job

I need experience with the best tools for the job.

  • Flutter

    • I tried to get some Flutter experience before starting the jam.  I’m now content that Flutter is the best development strategy for me, as it allows me to develop for both Android and iOS platforms with a single code base, and it’s reported to be relatively straightforward to learn.  However, it’s completely new to me and there just wasn’t enough time to get to grips with it in any real depth.
  • Dart
    • Flutter uses the Dart language, and so a solid general understanding of that will also be highly beneficial for me.
  • Process flow tool
    • During the creative piece from week 1, I had identified a need to find a more appropriate tool than PowerPoint to draw up process flow diagrams, but I hadn’t managed to do this in time
  • Wireframing tool
    • and it’s a similar situation with wireframing.  I did look at InVision as a possible tool, to help planning screen layouts, but learning how to use it was time that I couldn’t afford if I wanted to achieve anything else before the deadline. So I reverted to PowerPoint.  It does deliver aesthetically pleasing results, but it’s time consuming and becomes fiddly when working with small detail.  Maybe I should have settled for hand drawn sketches? I’ll explore this further.
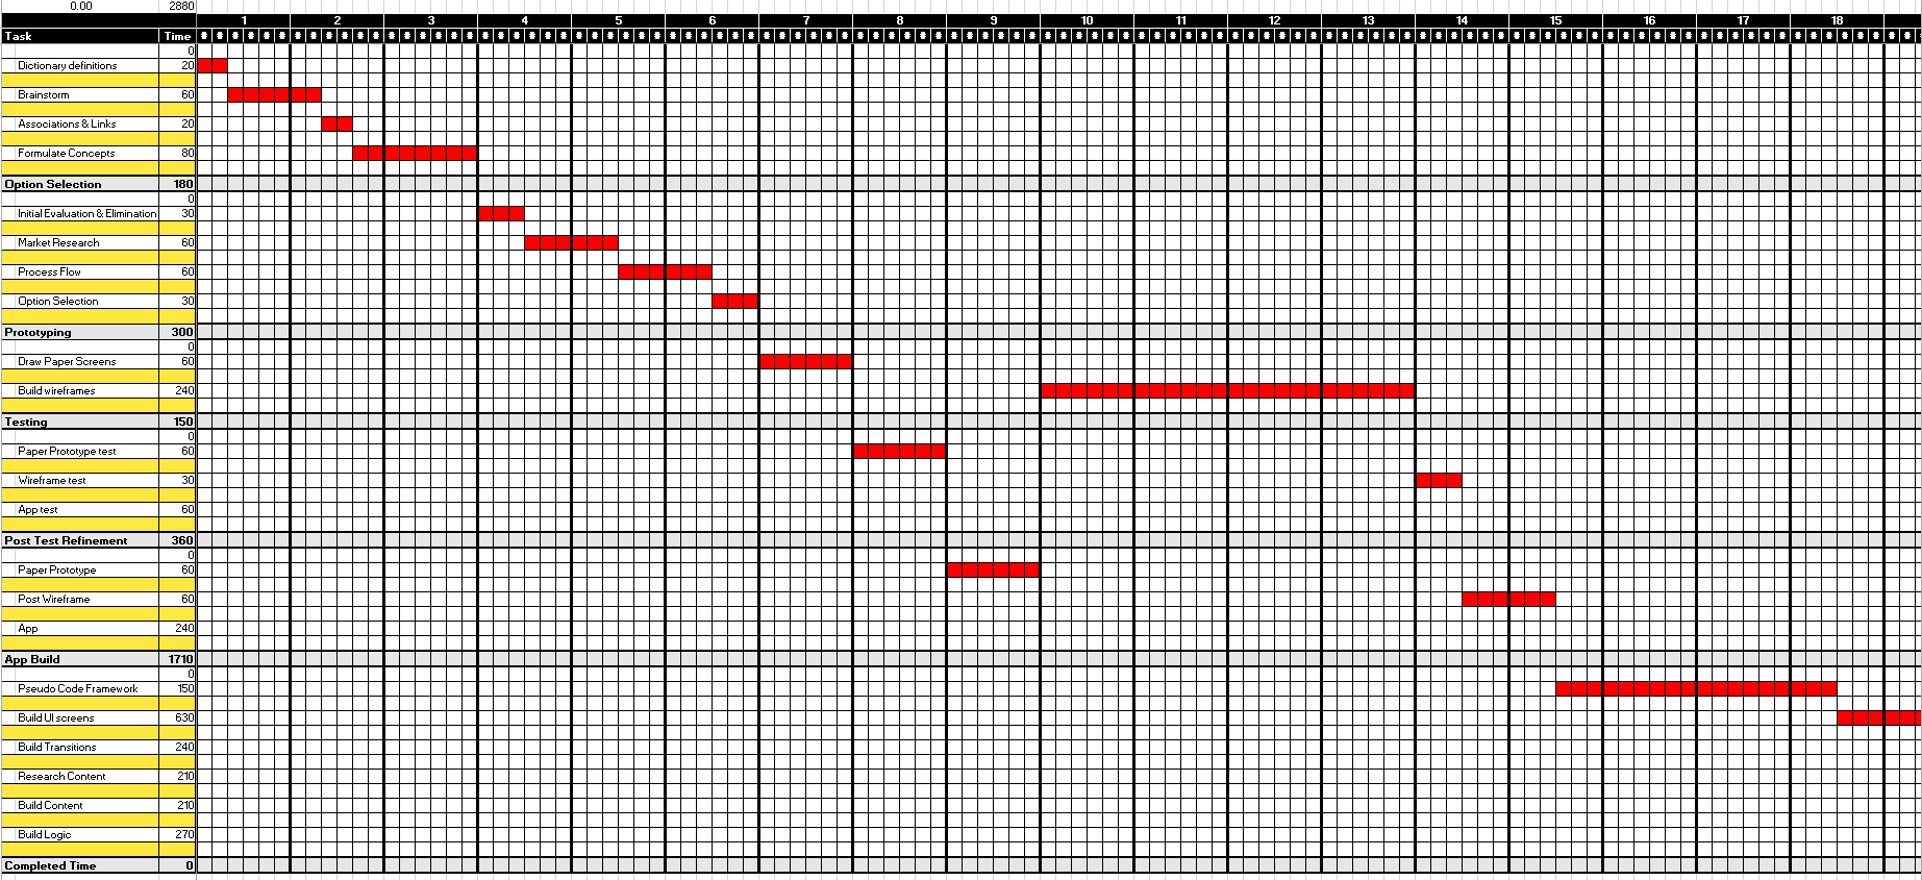
  • Time estimation

I based my plan for the jam on what I’d learnt from the week 1 creative piece. While the structure was, on the whole, fairly sound, my time estimations for each phase weren’t always very accurate.  I compensated for slippage by adjusting and capping subsequent tasks to stay on track.  Experience will help with this, but I’ll also look to adopt some Agile principles to improve my project management skills.

  • Select projects that inspire me

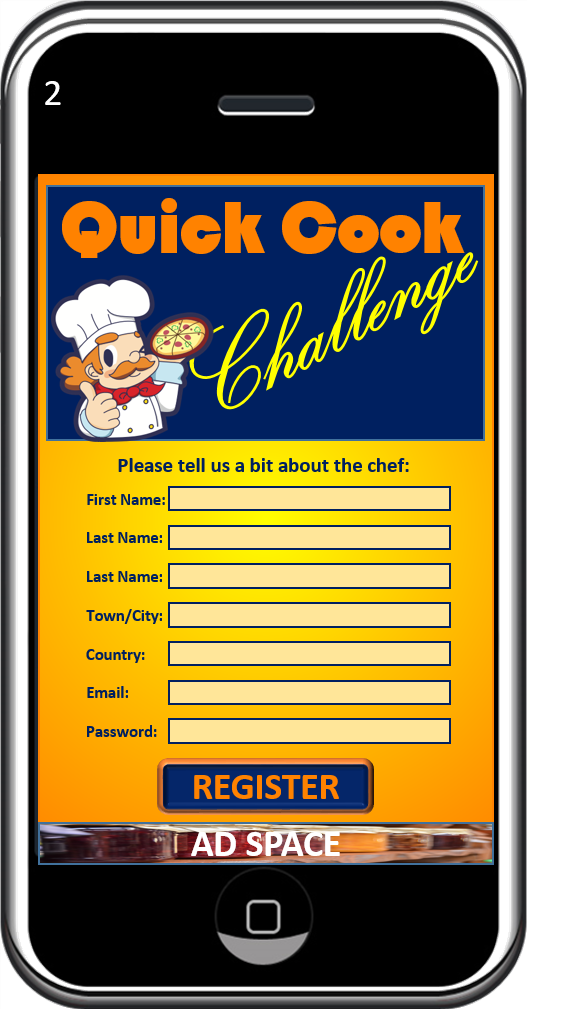
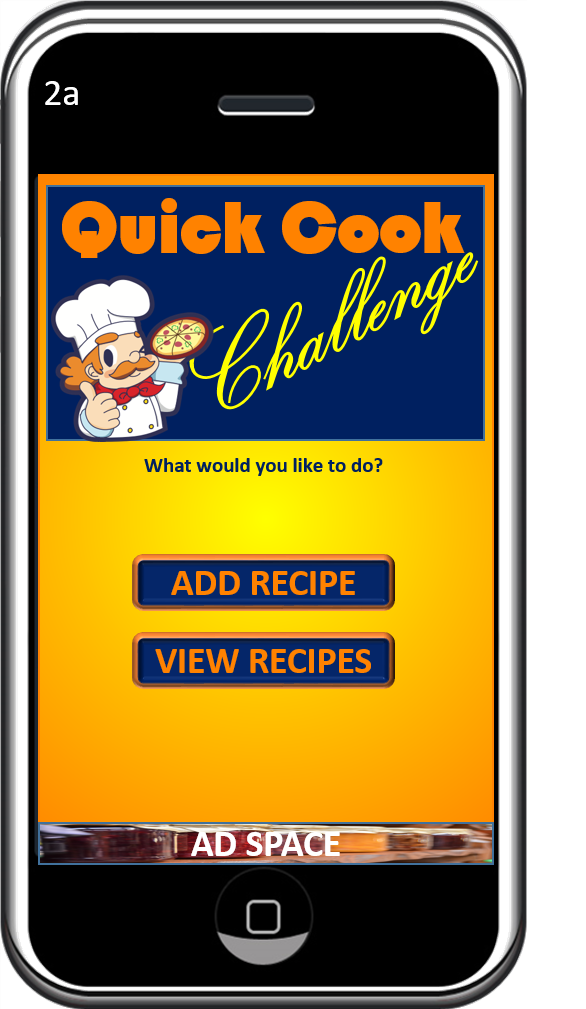
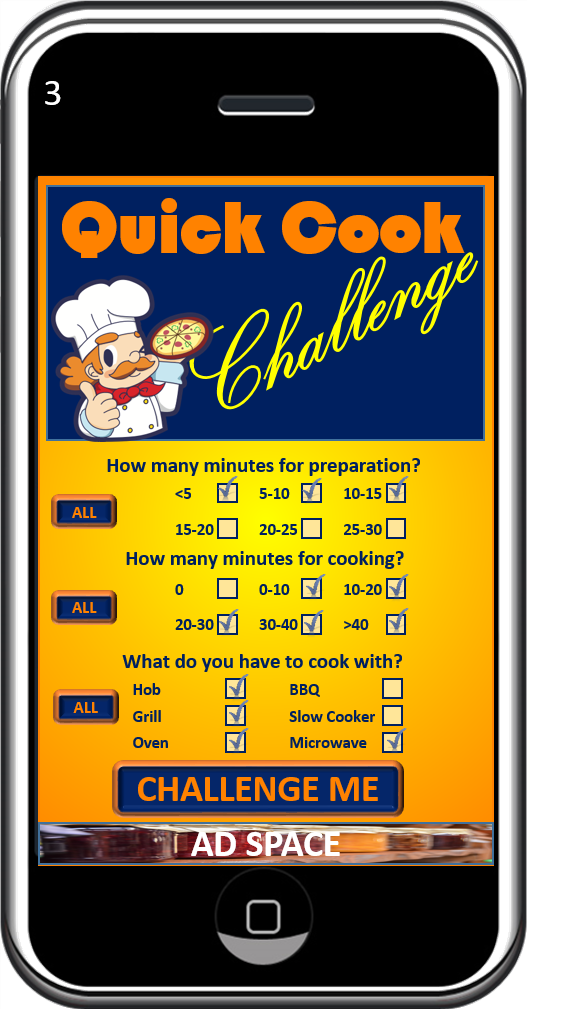
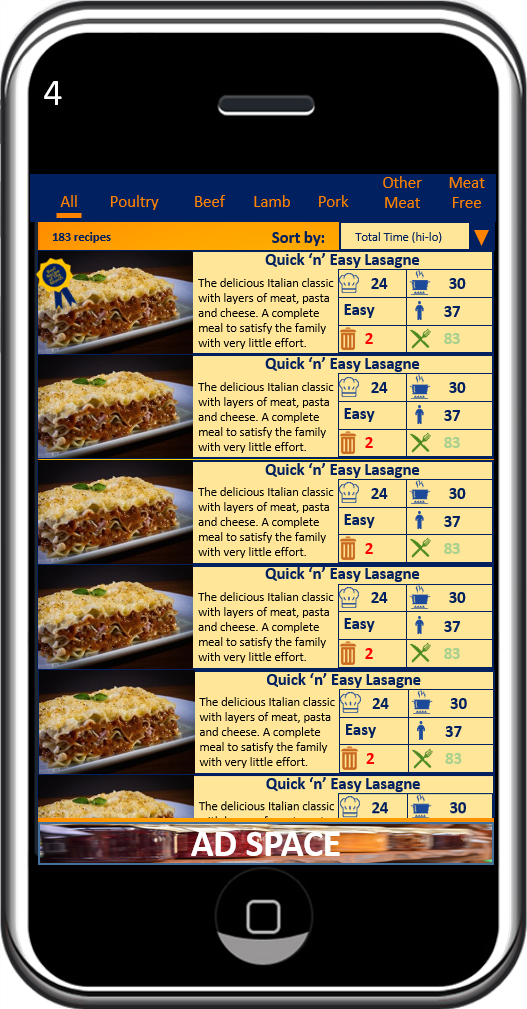
I generated a list of theme ideas, and decided to pursue my “Quick Cook Challenge” app idea, as it was something that I thought I might use myself, and some rudimentary research identified that there might be an opportunity in the market for it.  But, after working on this for a few days, I noticed myself beginning to procrastinate, which told me that I wasn’t as invested in the concept as I’d first thought, and I had to be quite disciplined to make progress with it.  I might have avoided this by generating a theme that I could really get excited about, had I afforded more time for the theme generation phase, and applied a more strategic concept assessment and selection criteria.

  • Subconscious thinking is valuable

Many of my better creative ideas happened while I was doing something completely unrelated, with thoughts just popping into my head from nowhere.  I need to capitalise on this and build purposeful breaks into my plan at the appropriate times, to allow for this subconscious ideation to happen.

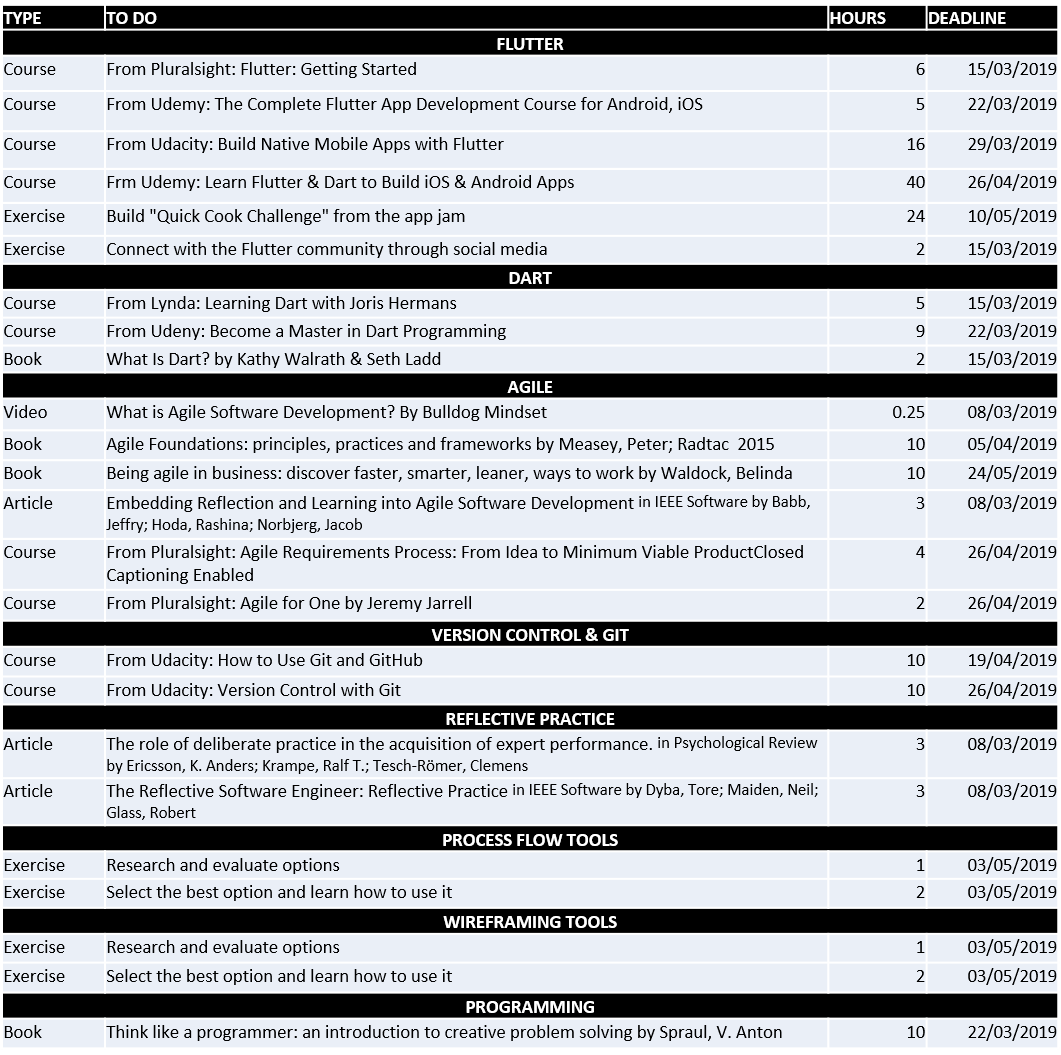
Taking all of this into account, my main objectives for the remainder of the module are:

Objectives for the rest of module 1

  1. Programming

Before the next Module starts, I will use Flutter to build a working prototype for the “Quick Cook Challenge” app, from the jam. I will apply the principles learned as I go through 6 Flutter and Dart tutorial courses, to create a fully working prototype.  I will dedicate 18 hours per week to this, as it is essential that I can comfortably build an app of a decent standard, for the rest of the course.  To further improve my capability, I will also read “Think Like a Programmer”, and engage with the Flutter community, by connecting with relevant individuals and groups on social media platforms, as well as sharing ideas with others within the study group who also have an interest in Flutter.

2. Version Control

By 26/04/19 I will be comfortable using Git and GitHub for version control, both from the command prompt, and through Android Studio, so that I am well prepared to work on collaborative projects.  I will spend 2-3 hours per week taking 2 video tutorial courses.

3. Development tools

Before the next Module starts, I will select and learn how to use:

  • A process flow diagramming tool to draw process flow diagrams more easily
  • A wireframing tool to create medium fidelity screen plans more quickly

I will assess 2 or 3 of each type, analysing the benefits over using pencil and paper, and select the ones that I feel most comfortable with, if any.  These tools could prove very useful during future app development projects.

4. Better time management

Feedback has, so far, been largely positive, and encouraging, but I’m finding myself falling behind the pace of the course, a little.  I need to adopt a more structured, but flexible, approach to managing my week, to help me to achieve a good balance of technical skills and coursework.  I’ll spend the next 2 weeks catching up, and then work to keep pace going forward, using this weekly plan, of 3 hour periods:

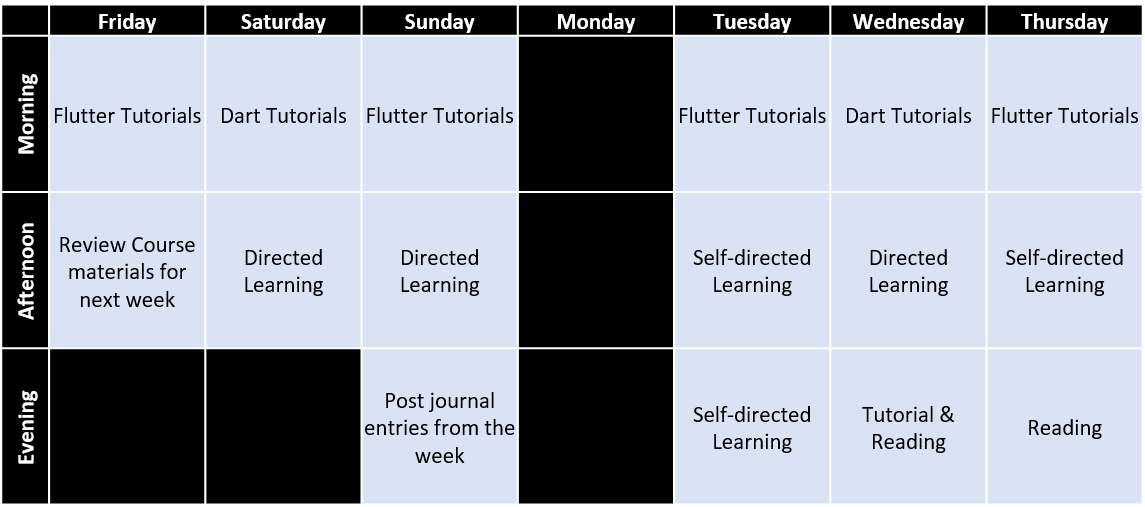
And this is how it all fits into my plan for the rest of the module.

Establishing The Flow & Prototyping

Having established the concept for my app, I set to work mapping out the process flow, in order to build up a picture of what screens are required, and how they should interact with each other to provide the user with logical paths, and decision points, from start to finish. Green boxes represent a screen and yellow diamonds represent a user decision, leading to alternative paths through the app:

Constructing a process flow diagram like this is very helpful in charting the various paths that must be provided for the user to intuitively move through the app, and the purpose of each screen that needs to be presented along the way.

Having learned from my experience in the creative piece from week 1, I constructed an initial version of this process flow diagram, and amended it when I identified any anomalies as I worked my way through the process of building screen layout prototypes. The final version is presented above.

As a starting point for prototyping, I spent some time roughly sketching screen layouts, which helped to clarify the purpose and features of each of the screens, and to refine the process flow diagram.

I then went on to convert those sketches into an increased fidelity (albeit still static) prototype . And here is the result of the prototyping exercise. Screen numbers correspond to the numbered boxes in the process flow diagram above:

ENDS

Refining The Concept

Now that I’ve decided to pursue the cooking challenge , I need to further develop the concept to design an app product that will stand out from the crowd.

Time prevents me from delving into the much deeper market research exercise that I would undertake, if this were a product that I intended to actually launch. Without this constraint, I would have spent a lot more time analysing the market for the existence of cooking challenge apps, and gaining a more thorough understanding of what the market wants and needs, and what it doesn’t. However, the research that I have done indicates a gap in the market, and so I aim to exploit that gap with a concept that encapsulates the following elements:

  • Government agencies are pushing for people to reduce their consumption of takeaway and convenience meals
  • There is a general upward trend toward wanting to adopt and maintain a healthier diet
  • The most popular reasons for not cooking at home include:
    • people are busy and don’t have the (perceived?) time to cook at home as frequently as they should (and could)
    • a perception that convenience foods are much cheaper than fresh foods
  • People like recipe apps and “food porn”
  • People enjoy communal food judgement

So I came up with the concept of “The Quick Cook Challenge” – The only app where you can find or share the recipes that suit your lifestyle, and celebrate your culinary successes, and disasters, with the community.

The app will provide a double hook, encouraging users to the platform who:

  • want to share their recipes and try new recipes posted by other community members
  • seek the entertainment value of judging the efforts of the community.

Next, I will look at the flow of the app, and design screen layout prototypes to deliver the features of the concept…

Option Selection – Market Research

I employed some rudimentary market research to compare the validity of the remaining two app concepts. I explored possible gaps in the market, with a view to identifying who is already doing something similar, pinpointing an untapped niche opportunity and the associated target market and formulate some semblance of a unique selling point to satisfy the needs and wants of that target market .

I looked at the mentor platform theme first and found that there are already quite a few platforms for matching mentors with mentees. Some are focused on a particular niche area, such as Mentor, for professional women, and iMentor for US students, but others, such as FindAMentor and Mentor City are more general, covering a wide range of mentoring opportunity.

I could have spent more time researching the market for mentoring, with the aim of identifying a niche to serve with a unique selling point, but decided to look at my cookery competition theme to see if I could spot any obvious opportunity there.

There are a LOT of recipe apps and websites. Too many to count. One of the most popular being “Yummly“, which carries more than 2 million recipes, and boasts a
worldwide membership base of over 30 million subscribers. There is clearly a huge appetite (pardon the pun) for recipe apps, which indicates that opportunity could well be present, if only I can find a fresh and unique angle that appeals to the market, whilst fulfilling the jam theme of “Guide”, “Restricted” and “Opponent”.

I then focused on cooking apps with a competitive/challenge element, and found surprisingly few. There is “Food Fu” and “Come Dine With Me”, which have (iOS only) apps that provide for holding a competition among your friends. And then there’s Reddit’s “52 weeks of cooking” challenge, which provides a theme each Monday, and encourages over 38 thousand subscribers to “cook something new”. There are also some small niche offerings, like “meatless Monday”.

I remembered seeing a Facebook group called “Rate my plate”, where members post pictures of what they are about to eat, for other members to judge and comment on, largely with derogatory, but playful, humour.

This group has a following of close to 2 million, which indicates that there are plenty of people that enjoy having their efforts judged (and even overtly ridiculed!) and plenty of people that are more than happy to oblige.

I suspect that this group (and other similar groups) grew out of the “Nailed it!” phenomenon that swept the internet, where people posted the amusing comparative results of their efforts to emulate culinary creations that they found in the internet:

With the current health-driven push for people to cook more fresh food at home (rather than rely on takeaway and convenience meals) and considering the popularity of recipe apps, and communal food judging, I believe that there is a strong USP to be found with a fusion of the 2 concepts. This is the concept that I will pursue.

Option Selection – Initial Evaluation & Elimination

I need to cut my list of possibilities down to just 2 to move forward with. I was expecting to have to spend some time deliberating this, but I arrived at my conclusion after asking just 2 questions:

1. Would I use it?

It’s so much easier to develop an app concept for which you consider yourself to fit the profile of the target market. Therefore, it was easy for me to eliminate the trades person’s work management tool and the children’s treasure hunt concepts.

2. Do I know enough about the subject area?

As time is a limiting factor here, it is wise to discard any concept that would require extensive research in order to generate authentic and meaningful content. I eliminated the habit breaker concept on this grounds. Although it is something that I think I might really enjoy bringing to life, I don’t know nearly enough about Neural Linguistic Programming, Cognitive Behavioural Therapy, or any of the necessary psychological techniques required to effectively make a difference. Extensive research time and collaboration with experts in the field would be essential and these are resources that I just don’t have at my disposal.

So that leaves me with two concepts to delve a little deeper into, to explore the possibilities:

  1. A cookery competition app
  2. A mentoring platform

Jam Ideation – Associations & Links And Formulate Concepts

The point of this stage is to analyse the result of the brainstorm, compare and contrast the lists that were generated, and start to consider the patterns, concepts and themes that emerge from that.

The Result

I took the full 20 minutes to came up with a list of general themes that could potentially lend themselves to solid app concepts, and satisfy the requirements of the jam theme. It then only took me a further 22.5 minutes to put a little flesh on the bones for each of the the top 5 themes to turn them into high level concepts (in no particular order):

  1. A treasure hunt style game for children, to guide them around an attraction or location e.g. a zoo or maybe a city centre, imposing restrictions, such as road blocks, along the way, They could be collecting tokens as they go, which generates a score, dictating their position on a leader board, where they can see how they performed, relative to their opponents (all other users).
  2. A cookery competition where opponents are guided by a recipe, with ingredient and time restrictions, with the video/ photo results uploaded to compete for likes.
  3. A habit breaker, that guides the user from their nemesis (opponent) ingrained habit, to freedom from the restricted lifestyle that the habit causes.
  4. A mentoring platform that matches those seeking guidance through a project, due to their restricted experience and/or ability. The user will then compete against opponent mentees to be selected by the mentor.
  5. A CRM and work management tool for independent tradespeople, guiding them through an efficient process from initial customer contact, through quoting, invoicing and building an ongoing relationship with the customer. Many Independent tradespeople are restricted by time and know how when it comes to administration and establishing an effective process. Using this app will help them to win jobs over opponent tradespeople.

I have managed to bank almost an hour of allotted time for this stage. The ideas flowed faster than I had expected them to, but, I do put some of this gain down to an overestimation of the time required to achieve this.

I now need to apply some evaluation criteria to whittle this list down to just 2 contenders…

Jam Ideation – Brainstorming

The purpose of this stage is to build upon the dictionary definitions of “GUIDE”, “OPPONENT” and “RESTRICTED” in a free flowing, unfiltered brain dump of word associations, synonyms, antonyms and anything else that might come to mind.

For the sake of clawing back the time lost during the dictionary definitions stage, I restricted my time on each of the words, and used good old pen and paper as my tools for the job, rather than employing digital methods. The benefit being that it is far quicker to scribble down the ideas as they come into your head, but this comes with the cost of presentation. In reality, this is not a problem as the true purpose is to generate ideas for yourself,. however, in this instance, the outcome will be shared in this blog post, so all I can do is apologise to the reader for my very untidy handwriting, which you will probably find illegible. I can read it, and that’s all that really matters.

The Result

I found that once I got started, the ideas flowed fairly quickly and effortlessly, up to a point, and then a more conscious thought process engaged as the speed of idea generation reduced. 15 minutes was adequate time for each of these words and so I called a halt early, which creates 5.5 minutes of extra time for the rest of my plan, which I’m sure I will be thankful for at some point.

Jam Ideation – Dictionary Definitions

The theme of the app jam is the three words:

GUIDE

OPPONENT

RESTRICTED

So the first step was to get a definition for each word from the Oxford English Dictionary online, and to then break each one down into appropriate chunks . The purpose of this is to provide a foundation for the creative process of exploring the possibilities that the theme affords. I used Powerpoint to do this as it is easy to rearrange the chunks as necessary.

The result:

Right off the bat, I’ve experienced slippage on the first task. This is down to a combination of factors:

  1. The original estimate of time required for this task was a little on the optimistic side.
  2. Breaking the definitions down into boxes in Powerpoint was a little more fiddly than I had anticipated.
  3. I had watched the theme revelation video before tackling this stage, but I hadn’t noticed the attached papers that explained the use of VNA (Verb, Non, Adjective) cards. I have since read them (but not until after I had completed the Associations and Links stage) and I now realise that “GUIDE” must be used as a verb, and so I might have wasted some time arranging and considering the definitions and examples of “Guide” used as a noun. I could have saved some, if not all of the excess time by ignoring them. Looking at it from a different angle though, a guide, is used to guide. The two are practically interchangeable, and so, it could be argued that exploring “GUIDE” as a noun was time well spent.

I will compensate for this slippage, and bring the critical path back into line, by restricting my Brainstorm stage to 16 minutes and 50 seconds per word, instead of the planned 20 minutes, making up the 9.5 minutes overshot on this phase. To help with this, I will abandon any digital tools in favour of a fast and furious pen and paper brainstorming session.

App Jam – The Plan

In preparation for the app jam, I have pulled together a Gantt chart on Excel, breaking down the task into the following categories, and sub-categories (with time allocations, in minutes, in brackets):

  1. Ideation (180)
    1. Dictionary definitions (20)
    2. Brainstorm (60)
    3. Associations & Links (20)
    4. Formulate Concepts (80)
  2. Option Selection (180)
    1. Initial Evaluation & Elimination (30)
    2. Market Research (60)
    3. Process Flow (60)
    4. Option Selection (30)
  3. Prototyping (300)
    1. Draw Paper Screens (60)
    2. Build wireframes (240)
  4. Testing (150)
    1. Paper prototype test (60)
    2. Wireframe test (30)
    3. App test (60)
  5. Post Test Refinement (360)
    1. Paper Prototype (60)
    2. Wireframe (60)
    3. App (240)
  6. App Build (1710)
    1. Pseudo Code Framework (150)
    2. Build UI screens (630)
    3. Build Transitions (240)
    4. Research Content (210)
    5. Build Content (210)
    6. Build Logic (270)

I have allocated the available time (48 hours, or 2880 minutes) as I currently feel is appropriate. I am backloading the plan, affording more than half of the available time to the build process, as I know that my current coding capabilities are very low and slow, so I will need to seek regular guidance from online sources throughout the build phase.

I will manage the project timings tightly, using a countdown timer app on an old Samsung Galaxy S5 device that I use for development and testing (so that I don’t have to root my own phone). I am, however, prepared to allow for some flexibility if and when I feel that my predicted time requirement was unrealistic, or if the nature of the app selected justifies deviation from the plan. For example, if I were to generate a great concept that would require more time to research the content, then I would consider pulling back the allocation for other sub-categories to compensate, as long as I feel that this will not have an adverse effect on the overall 48 hour deadline.
I will pause the clock while I am not working on the jam and record the actual time taken for each sub-category on the Gantt chart as I finish them, which will be used in a post-jam variance analysis exercise.

With my plan in place, it’s time to jam…

Flutter: Getting Started

This course is exactly what I need in order to commence my Flutter development. I’m only half way through, so far, but this is enough to convince me that Flutter is indeed the best way for me to proceed.

There are step-by-step instructions for building a number of simple apps. Although I am copying the code provided, it is helping me to gain an understanding of how the Dart language is used to nest widgets in order to build up screen layouts. Here are photos of the two apps that I have built with this course to date:

The tutorial uses Visual Studio Code as it’s IDE, whereas I am using Android Studio, due to my familiarity with it. There have been a few instances where I’ve needed to use Google to find the AS equivalent of a VSC keystroke or function, but on the whole, it hasn’t really posed much of an issue.

The tutorial also uses an earlier version of Dart. I came across a situation where a void class was used in the tutorial to return a null response, which worked fine for the instructor. But when I came to run the code, Android Studio flagged an error. A little research informed me that Dart version 2 treats void classes differently to version 1. I need to find and take a general Dart course to help me to become comfortable with Dart, and fully understand this void situation. However, I managed to overcome the runtime error by bringing the commands within the void class into the main class. I know that this is not the optimal solution, but with my current lack of Dart knowledge, it was the best fix that I could apply to make the app work as it should.

When I compare my (albeit, currently short) experience of Dart and Flutter to a similar point in my learning Java for Android, Dart and Flutter seem to be so much easier to take on board. It took me a long time to get to grips with Java (the first real Object Orientated Programming language that I had experienced). Although I was beginning to feel some semblance of a level of confidence with it come the end of my nanodegree course, I was still unable to build complex code structures, such as recycler views, asynchronous tasks and JSON readers, without following along with a tutorial. I’m sure this will be the same with Flutter, but I suspect that this stage will not last nearly as long, as the code seems to be far simpler. Flutter also offers on-screen options that appear as you commence typing, making it a far more intuitive coding experience than Java is. Having said that, I fully appreciate that the Java learning experience is helping to make learning Flutter easier than it otherwise would have been, so i still consider that to be time well spent.

The hot reload function that Flutter offers is also a huge development-time advantage over the Java method of rebuilding the app every time you want to see your code running on a device or emulator. After the first load,hot reload simply sends and implements just the changes that have been made to the code, and so it is infinitely quicker, less than a second in some cases (as opposed to minutes), saving a considerable amount of development time over the course of a project.

This early on, the one area that is causing me problems (so far) is using the correct bracket type – (,{ or [ – and punctuation marks – colons, semicolon and commas – in the right place for the widgets to be properly nested. It can get quite confusing, but it’s just a case of practice makes perfect. Completing this course and going through the other 2 Flutter courses will provide me with plenty of practice in this area, but I also think that a general Dart beginners course will be really useful with this too, so I will seek some out.

In addition, I have sourced a kindle book for Dart, which I will start reading soon. I have also just discovered an article on Medium that lists a number of IDE shortcut keystrokes that will be very helpful with getting this right.

I can see a lot of potential for Flutter. I have very much enjoyed my first real experience with it, and I’m looking forward to spending a lot more time learning. Disappointingly, for the next couple of weeks, the app jam will have to take priority and so I will be unable to afford as much time as I would like, if any, with Flutter tutorials. I’m hoping that the workload will calm down a bit after that, so I can get the opportunity spend some good quality time establishing some solid Flutter skills.

Develop With Flutter And Firebase

This course runs for less than an hour, and so I wasn’t expecting too much from it. It was too early in my learning to be looking at integrating Firebase with Flutter apps really, but it was worthwhile in so far as I now have a conceptual appreciation for the functionality, and I can always come back to the video when I am at a point where I need to integrate Firebase.

Learning Google Flutter for Mobile Developers

This course runs for less than 2 hours, so I didn’t expect to emerge from it with any level of expertise, but I was still left a little disappointed. While it was interesting, I didn’t find it particularly instructional. It did, however, give me a flavour of what to expect from Flutter, which was good, but I certainly didn’t feel equipped to start coding afterwards. Not to worry, this just the first of 5 courses that I have lined up…

.

Test Driving Flutter

Following last week’s in-depth research into development strategy options (which actually ran well into this week too), I’m keen to roll up my sleeves and get stuck into learning how to develop Android & iOS apps with Flutter.

I found 5 video tutorial courses:

  1. From Lynda: Learning Google Flutter for Mobile Developers
  2. From Lynda: Develop With Flutter And Firebase
  3. From Pluralsight: Flutter: Getting Started
  4. From Udemy: The Complete Flutter App Development Course for Android, iOS
  5. From Udacity: Build Native Mobile Apps with Flutter

I’m sure there will be a certain amount of commonality between them, but going over the same things a few times can only do me good in the long-run, and it will be interesting to see different perspectives, and whether there are alternative ways of doing things.

On the flip side, I am expecting each course to have at least some unique content, and so I think it will be highly beneficial for me to work my way through all of these courses, and more besides.

App Jam

This week is all about the app jam. This is my first experience of a jam and so it is a little daunting. But, in essence, it’s a very similar exercise to the creative piece in week 1. That went OK, and I learned a few lessons from it, so what’s the worst that can happen?

I do feel that this jam has come a little early for me though. As much as I would like to finish the 48 hour stint with a fully working app, I am currently but a few hours into my Flutter test drive, and so the hope of achieving a fully working app within 48 hours is somewhat optimistic, if not unrealistic.

Therefore, my plan for the jam will make allowances for this, and afford as much of the allotted time as possible to the building of the app. Will this be at the expense of the other phases of the process? Possibly, but I will just have to sharpen my focus throughout the earlier stages, making sure that I use my time as efficiently as possible, minimise wasted time, and reach decisions swiftly.

I am fully aware that I have a tendency to over analyse situations in the pursuit of an optimal outcome. This is not necessarily a bad thing in many circumstances, but time is of the essence here, and so I need to make a conscious effort to keep to milestone deadlines wherever possible, and to trust my intuition, if and when necessary, rather than spending too much time gathering supporting evidence.

If I should finish up with a fully working app within 48 hours, that’ll be great. However, that is a secondary concern for me. I am primarily focusing on what I can learn from the process of this jam, which will, in itself, reap rewards during subsequent similar circumstances.

Design a site like this with WordPress.com
Get started